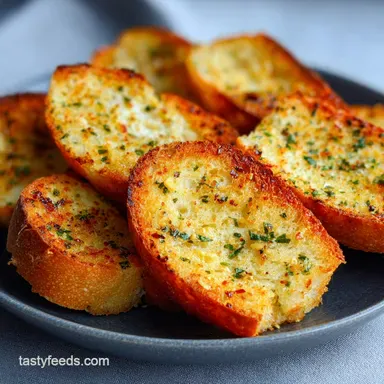
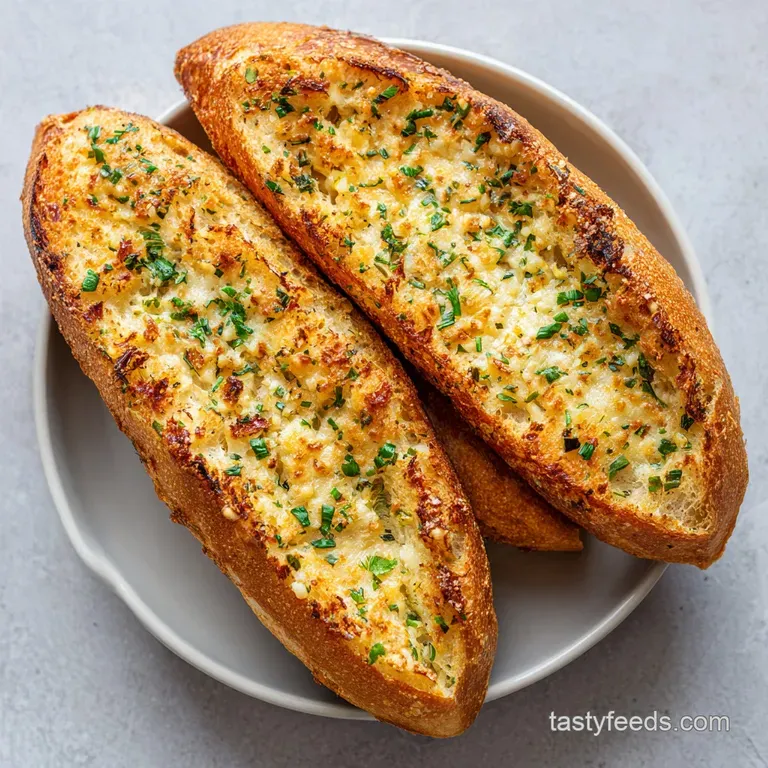
The Best Garlic Bread: Crispy and Golden
- Time: Active 10 minutes, Passive 15 minutes, Total 25 minutes
- Flavor/Texture Hook: Shatteringly crisp crust with a velvety, garlic infused center
- Perfect for: Family pasta nights, viral snack platters, or budget-friendly party sides
- Secrets Behind the Best Garlic Bread Recipe
- Key Success Metrics for This Bread Recipe
- Component Analysis for the Best Garlic Flavor
- Tools Required for a Golden Crust
- Mastering the Two Stage Baking Technique
- Solving Common Texture and Flavor Issues
- Creative Variations for Your Garlic Butter Bread
- Scaling Guidelines for Large Groups
- Debunking Garlic Bread Beliefs
- Guidelines for Storing and Reheating Leftovers
- Perfect Meal Pairings for This Garlic Side
- Recipe FAQs
- 📝 Recipe Card
Secrets Behind the Best Garlic Bread Recipe
We’ve all been there, right? You pull a loaf out of the oven, expecting that glorious crunch, only to find the middle has turned into a literal oil slick while the edges are hard enough to chip a tooth. It’s a total buzzkill.
I used to think the answer was just adding more butter, but that actually makes the sogginess worse. The real struggle isn't the amount of fat, but how that fat interacts with the crumb of the bread.
The fix I'm sharing today is all about the "aerated spread" technique. By whipping softened butter with a splash of olive oil, we create a light, stable emulsion. This doesn't just sit on top or soak straight through to the bottom like melted butter does.
Instead, it grips the nooks and crannies of the French bread, creating a barrier that toasts the surface while keeping the inside soft.
This is the best garlic bread recipe because it treats the bread like a canvas, not just a delivery vehicle for grease. We’re using a mix of fresh garlic for that spicy bite and a hint of powder for that deep, "viral" snack flavor everyone craves.
Whether you're serving this alongside a big bowl of pasta or just eating it over the sink (no judgment), this method guarantees that every bite has that satisfying shatter.
Key Success Metrics for This Bread Recipe
Success in the kitchen usually comes down to understanding why things happen, rather than just following a list of rules. I used to blindly follow recipes until I realized that heat and fat behave in very specific ways depending on how they are introduced to the starch.
This recipe isn't just about throwing things together; it’s about managing moisture and heat to get that specific texture.
Emulsion Stability: By creaming the butter and oil together, you prevent the fats from separating and soaking through the bread immediately, which is the main cause of a soggy middle.
Starch Gelatinization: The high heat of a 375°F oven causes the starches on the surface to firm up quickly, trapping the steam inside for a soft interior.
Aromatic Infusion: Using both fresh and powdered garlic ensures a multi layered flavor profile where the fresh cloves provide punch and the powder provides a consistent base.
Maillard Reaction: The addition of Parmesan cheese doesn't just add salt; the proteins in the cheese undergo browning that creates a complex, savory crust.
Quick Decision Guide for Cooking Methods
| Method | Time | Texture | Best For |
|---|---|---|---|
| Standard Oven | 15 minutes | Balanced crunch and soft center | Large family dinners |
| Air Fryer | 8 minutes | Extra crispy, more "fried" finish | Quick snacks for two |
| Broiler Only | 5 minutes | Charred edges, very soft middle | Last minute side dishes |
If you are looking for a show stopping side for a big gathering, the standard oven method is your best bet because it allows the heat to penetrate the bread evenly. However, if you're in a rush, the air fryer is a literal snack queen move that gets the job done in half the time.
Component Analysis for the Best Garlic Flavor
When we talk about making the best garlic bread recipe, we have to talk about the ingredients. This isn't the time for the pre minced stuff in a jar. That garlic has been sitting in citric acid and lost all its soul. We want the real deal.
Fresh cloves give you that sharp, pungent aroma that fills the house and makes everyone run to the kitchen.
| Ingredient | Science Role | Pro Secret |
|---|---|---|
| French Bread | Provides a sturdy but airy structure for the fats to cling to. | Use bread that is a day old; slightly dry bread absorbs the butter better without getting mushy. |
| Unsalted Butter | Acts as the primary flavor carrier and provides a velvety mouthfeel. | Make sure it is truly "softened," not melted, to maintain the aerated structure. |
| Extra Virgin Olive Oil | Lowers the melting point of the spread and adds fruity notes. | Use a high-quality oil to prevent a heavy, greasy aftertaste. |
| Parmesan Cheese | Adds salt and helps create a structural "crust" through browning. | Grate it fresh if possible for a better melt than the pre shredded stuff in bags. |
Choosing the right loaf is half the battle. A standard French loaf from the grocery store bakery is perfect because it has a thin, crisp crust and a wide, soft interior. If you try to use a heavy sourdough, the butter won't penetrate as well, and you'll end up with a very tough chew.
I’ve made that mistake before, and my jaw was tired by the end of dinner!
Tools Required for a Golden Crust
You don't need a high tech kitchen to pull this off, but a few specific tools make a world of difference. First and foremost, a serrated knife is non negotiable. If you try to use a smooth chef's knife, you'll just squish the bread, ruining that airy structure we need for the butter to live in.
A long, "sawing" motion with a serrated blade keeps the loaf's height intact.
A rimmed baking sheet is also essential. As the butter melts and bubbles, you don't want any of those precious juices dripping onto the bottom of your oven and starting a fire (yes, I have done this, and yes, the smoke alarm is very loud). Lining the sheet with parchment paper is my favorite budget friendly hack.
It reflects heat just enough to crisp the bottom of the bread while making cleanup as simple as throwing a piece of paper away.
Finally,, a small rubber spatula is your best friend for the "creaming" phase. You want to be able to mash the garlic and herbs into the butter until it looks almost like a pale green frosting. This ensures every single millimeter of the bread gets an equal share of the flavor.
Mastering the Two Stage Baking Technique
Right then, let's crack on with the actual cooking. This process is fast, so make sure your oven is fully preheated before you even start slicing. That initial blast of heat is what sets the crust before the butter can migrate too far into the center.
- Prepare the spread. In a small mixing bowl, combine the 0.5 cup softened unsalted butter, 2 tbsp extra virgin olive oil, 6 minced garlic cloves, 0.5 tsp garlic powder, 0.5 tsp sea salt, and 0.25 cup chopped parsley.
- Cream until light. Use a rubber spatula to cream the ingredients together until the mixture is pale, light, and aerated. Note: This aeration prevents the butter from just melting and running off the bread.
- Slice the loaf. Using a serrated bread knife, slice the 16 oz French bread loaf in half lengthwise.
- Prep the sheet. Place both halves cut side up on a large rimmed baking sheet lined with parchment paper.
- Apply the butter. Spread the garlic butter mixture generously across the cut surface of both bread halves.
- Reach the edges. Ensure you spread the mixture all the way to the very edges of the crust. Note: This prevents the edges from burning while the middle is still cooking.
- Add the cheese. Evenly sprinkle the 0.25 cup grated Parmesan cheese over the butter layer.
- Bake. Place in a 375°F (190°C) oven and bake open faced for 10–12 minutes until the butter is bubbling and the edges begin to turn golden brown.
- The final touch. For a more charred finish, broil on high for the final 1-2 minutes until the cheese is spotted brown and sizzling.
- Slice and serve. Let it rest for just 60 seconds before slicing into individual pieces to keep the bread from compressing.
Solving Common Texture and Flavor Issues

Even with the best instructions, things can go sideways. Maybe your oven runs hot, or maybe your garlic was particularly potent. The most common heartbreak is a soggy middle. This usually happens because the butter wasn't creamed well enough or the oven wasn't hot enough to "set" the surface.
If you see your bread looking a bit limp, don't panic. You can usually save it with a quick blast of heat.
Another issue is the "garlic burn." Fresh garlic can turn bitter if it's exposed to direct, intense heat for too long without enough fat to protect it. By mixing the garlic into the butter and oil, we’re essentially confitting it as it bakes.
It mellows out the bite and turns it into a sweet, savory umami bomb.
Quick Fix Guide
| Problem | Root Cause | Solution |
|---|---|---|
| Soggy/Greasy Center | Butter was melted or too warm before spreading. | Ensure butter is "room temp soft," not oily, before creaming. |
| Burnt Garlic Bits | Garlic was chopped too large or oven was too high. | Mince garlic very finely and keep it tucked into the butter layer. |
| Tough/Hard Crust | Bread was over baked or sliced too thin. | Keep the loaf in halves until after baking to retain moisture. |
The texture of your bread is a huge part of the experience. If you're serving this alongside a hearty best beef stroganoff, you actually want a slightly sturdier crust so you can use the bread to scoop up that creamy sauce. If the bread is too soft, it will just fall apart in the gravy.
Common Mistakes Checklist
- ✓ Avoid using "spreadable" butter from a tub; it contains too much water and air, which leads to steam and sogginess.
- ✓ Don't skip the olive oil - it helps the butter penetrate just enough without making the bread feel heavy.
- ✓ Never use dried parsley if you can help it; it tastes like grass compared to the bright, fresh pop of the real thing.
- ✓ Ensure your oven is actually at 375°F (190°C) using a thermometer; low heat is the enemy of a crispy crust.
- ✓ Resist the urge to wrap the bread in foil while baking unless you specifically want a soft, steamed texture.
Creative Variations for Your Garlic Butter Bread
Once you've mastered the base version, you can start playing around with different flavors. I love a good "viral" twist on a classic. For instance, if you want something with a bit of a kick, adding a teaspoon of red pepper flakes to the butter mixture changes the entire vibe.
It becomes this spicy, buttery experience that pairs incredibly well with cooling side dishes.
For a true party stopper, I often turn this into the best cheesy garlic bread recipe by adding a layer of low moisture mozzarella under the Parmesan. When the mozzarella melts, it creates those long, dramatic cheese pulls that everyone loves to film for their socials. Just remember to keep the cheese layer thin so you don't trap too much steam and make the bread soggy.
Customizing Your Loaf
- If you want a deeper flavor, add 1 tsp of balsamic glaze over the top after baking.
- If you want a herbaceous punch, swap half the parsley for fresh basil and oregano.
- If you want a "cheesy" fix without dairy, use nutritional yeast in place of the Parmesan.
Scaling Guidelines for Large Groups
If you're hosting a big dinner party, you'll probably need more than one loaf. Scaling this recipe is fairly straightforward, but there are a few things to keep in mind regarding the aromatics.
When you double the recipe, you don't necessarily need to double the salt or the garlic powder, as those flavors can become overwhelming very quickly.
Scaling Down (1/2 loaf): If you're just making a snack for yourself, use a smaller French roll. Cut the butter and oil in half, but keep at least 2 cloves of garlic. Even a small amount of bread needs that garlic punch!
Reduce the bake time by about 3 minutes since a smaller piece of bread heats through faster.
Scaling Up (2-4 loaves): For a crowd, you can prep the garlic butter in a large batch. Keep the salt and garlic powder to about 1.5x the original amount for every 2 loaves to keep the balance. The most important thing when scaling up is not to overcrowd your baking sheets.
If the loaves are too close together, they will steam each other instead of crisping. Work in batches if you have to!
Debunking Garlic Bread Beliefs
There's a lot of "old school" advice out there that actually ruins a good loaf of garlic bread. One of the biggest offenders is the idea that you should wrap the bread in foil before putting it in the oven. Unless you are trying to soften a loaf that is three days old and hard as a rock, foil is your enemy.
It traps all the moisture, resulting in a steamed, rubbery texture instead of that "shatter" we're looking for.
Another myth is that you must use roasted garlic for the best flavor. While roasted garlic is delicious, it has a very different, much sweeter profile. For a classic, punchy garlic bread, you need the sharp "zing" of fresh garlic combined with the consistent savory notes of the powder.
Using only roasted garlic can result in a spread that is too mild and almost "muddy" in flavor.
Guidelines for Storing and Reheating Leftovers
Honestly, we rarely have leftovers in my house, but on the off chance you do, don't you dare put them in the microwave! Microwaving bread turns it into a rubber tire within thirty seconds. To keep that crispy texture, the oven or a toaster oven is your only real option.
Storage: Keep leftover slices in an airtight container in the fridge for up to 3 days. If you want to keep it longer, you can freeze the slices for up to 2 months. Just wrap them individually in plastic wrap and then put them in a freezer bag.
Reheating: To bring that "shatter" back to life, place the cold slices on a baking sheet and pop them into a 350°F (180°C) oven for about 5-8 minutes.
If you’re reheating from frozen, don't thaw them first just put them straight into the oven and add 2-3 minutes to the time.
Zero Waste Tip: If you have crusts or ends that nobody wants to eat, don't toss them! Pulse them in a food processor to make the most incredible garlic infused breadcrumbs you've ever had. They are amazing on top of a Southern cheesy squash casserole or used as a coating for crispy chicken.
Perfect Meal Pairings for This Garlic Side
The beauty of this bread is its versatility. It’s the ultimate supporting actor. It’s rugged enough to stand up to a heavy meat sauce but delicate enough to serve alongside a light salad.
I personally love it with something that has a lot of "dip ability." There is nothing more satisfying than using a piece of the best garlic bread recipe to swipe up the last bit of sauce from a plate.
If you’re doing a full Italian night, it’s obviously a requirement for lasagna or spaghetti. But think outside the box! It’s also a killer side for a creamy soup or a big bowl of steamed mussels. The garlic and parsley notes complement seafood beautifully.
Whatever you serve it with, just make sure you have plenty of napkins that buttery, crispy crust is messy in the best way possible. Trust me, once you try the aerated butter method, the frozen box stuff will never cross your threshold again!
Recipe FAQs
How to make really good homemade garlic bread?
Cream the softened butter with olive oil, minced fresh garlic, garlic powder, sea salt, and fresh parsley until the mixture is light and aerated. Spread this butter layer edge-to-edge on a halved French bread loaf, top with grated Parmesan, and bake at 375°F (190°C) for 10 12 minutes.
What is the trick to garlic bread?
Use high-quality softened butter rather than tubbed spreadable varieties, which contain too much water that can result in soggy bread. Ensuring your oven is accurately preheated to 375°F (190°C) is critical to achieving that perfect golden, bubbling crust.
What makes restaurant garlic bread so good?
The secret lies in the balance of fresh aromatics and high heat finishing. By using both minced fresh garlic and garlic powder along with a quick broil for the final 1 2 minutes, you achieve an intense depth of flavor and texture that mimics professional results.
What kind of bread makes the best garlic bread?
A standard 16 oz French bread loaf is ideal because its airy, porous crumb absorbs the garlic butter mixture effectively. If you enjoyed working with the texture of this loaf, see how the same principles of crumb structure apply when you bake your own buns for other meals.
Is it true I must wrap the bread in foil to keep it moist?
No, this is a common misconception. Wrapping the bread in foil prevents the surface from crisping up and can actually result in a soft, steamed texture instead of the desirable crunch you want for garlic bread.
How to ensure the garlic flavor is evenly distributed?
Cream the butter and aromatics thoroughly using a rubber spatula before applying the mixture to the bread. This ensures the minced garlic and salt are suspended evenly in the fat, preventing flavor pockets and ensuring every bite is seasoned perfectly.
How to get the cheese perfectly golden without burning the bread?
Bake the bread open faced at 375°F (190°C) until bubbling, then switch your oven to the high broil setting strictly for the final 1 2 minutes. Keep a close watch during the broiling phase to catch the Parmesan the moment it turns golden brown.
The Best Garlic Bread