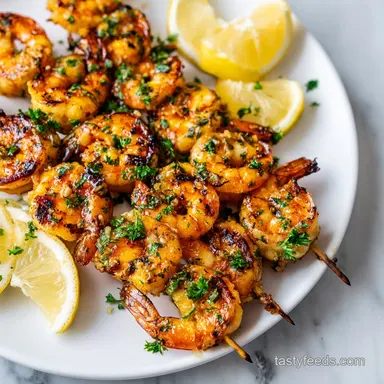
Garlic Butter Grilled Shrimp Skewers: Tender and Charred
- Time: Active 15 minutes, Passive 6 minutes, Total 21 minutes
- Flavor/Texture Hook: Snappy, buttery, and kissed with a smoky char
- Perfect for: High speed weeknight survival or impressive weekend hosting
- Mastering the Best Garlic Butter Grilled Shrimp Skewers
- The Science of Succulent Shrimp
- The Essential Component Breakdown
- Necessary Tools for Survival
- The Ingredient List
- Step-by-Step Cooking Guide
- Troubleshooting and Fixes
- Scaling for the Crowd
- Heat Method Comparison
- Myths About Grilling Shellfish
- Storage and Longevity
- What to Serve Alongside
- Recipe FAQs
- 📝 Recipe Card
Mastering the Best Garlic Butter Grilled Shrimp Skewers
Imagine the sound of the grill hitting 250°C. You lay those skewers down, and immediately, the air fills with the scent of bubbling butter, sharp garlic, and the sweet, oceanic aroma of searing shellfish. There's no waiting around for a slow braise here.
This is fast paced, over high heat cooking where every second counts. The butter drips onto the coals, sending up tiny puffs of smoke that wrap around the shrimp, creating a flavor profile that’s impossible to replicate indoors.
Most people struggle with shrimp because they treat them like steak they cook them too long or wait for a "sear" that never comes because the surface was too wet. We're going to fix that with a few survival mode tricks.
By the time you pull these off the grates, the shells (if you left them on) or the edges of the meat should be slightly charred and translucent white, turning into a vibrant, opaque orange. It’s a visual cue that never lies.
We aren't doing complicated marinades that turn the meat into mush. We are focusing on surface chemistry and heat management. You want that first bite to shatter slightly at the edges before giving way to a velvety, garlic soaked center.
It’s direct, it’s bold, and it’s exactly what you need when you want a high impact meal without the laborious cleanup.
The Science of Succulent Shrimp
Understanding how heat affects a small protein like shrimp is the difference between a rubbery mess and a masterpiece. Because shrimp are mostly water and protein, they tighten up the moment they hit the heat. Our goal is to slow that tightening while speeding up the browning.
- The Brine Effect: Salt alters the protein structure, allowing the shrimp to hold onto more moisture, while sugar encourages the Maillard reaction at lower temperatures for a better crust.
- Stable Emulsification: Whisking lemon juice into melted butter creates a temporary emulsion that clings to the shrimp rather than just sliding off into the flames.
- Thermal Spacing: Leaving a tiny gap between the shrimp on the skewer allows hot air to circulate, ensuring the sides cook as fast as the top and bottom.
- Sugar Assisted Searing: A tiny amount of granulated sugar acts as a catalyst for browning, giving you that mahogany color before the inside overcooks.
| Thickness | Internal Temp | Rest Time | Visual Cue |
|---|---|---|---|
| 1.5 cm (Jumbo) | 50°C | 2 minutes | Opaque white center |
| 2 cm (Colossal) | 52°C | 3 minutes | Firm to the touch |
| 1 cm (Large) | 48°C | 1 minute | C shape curl |
Setting the stage with the right temperatures ensures you never serve a dry skewer again. Heat management is everything here. Much like perfecting the Pan Seared Steak method, you need to trust the clock and the visual cues more than your gut feeling. Shrimp wait for no one.
The Essential Component Breakdown
Every ingredient in this lineup has a specific job. We aren't adding things for "vibes"; we are adding them for chemistry and flavor impact. If an ingredient doesn't contribute to the texture or the sear, it doesn't belong on the skewer.
| Ingredient | Science Role | Pro Secret |
|---|---|---|
| Jumbo Shrimp | Protein Base | Keep the tails on for a "handle" and extra flavor depth during the sear. |
| Unsalted Butter | Fat Carrier | Use unsalted to control the seasoning precisely during the brining phase. |
| Fresh Garlic | Aromatics | Microplane it into a paste so it melts into the butter instead of burning in chunks. |
| Smoked Paprika | Color & Smoke | Provides an "outdoor" flavor even if you're using a gas grill or griddle. |
When you're in the kitchen, focus on the quality of the fat. Butter is our vehicle for garlic, and it needs to be high-quality because it makes up the bulk of the "sauce" that coats the palate.
Necessary Tools for Survival
You don't need a kitchen full of gadgets, but you do need tools that can handle high heat. If you're using bamboo skewers, they are a liability unless you prep them right. Metal skewers are the better choice for heat conduction, but we can make either work.
- Grill: Gas or charcoal, it needs to be screaming hot (at least 230°C to 250°C).
- Skewers: If using wood, soak them for at least 30 minutes to prevent them from turning into kindling.
- Basting Brush: Silicone is best here because it won't melt and it holds onto the thick garlic butter glaze.
- Microplane: For turning those 6 cloves of garlic into a fine paste that emulsifies perfectly.
The Prep Timeline
- 0-15 Mins: Soak skewers, peel shrimp, and apply the dry brine.
- 15-20 Mins: Whisk the garlic butter and thread the shrimp.
- 20-21 Mins: over High heat sear and finish with a fresh squeeze of lemon.
The Ingredient List
Here is what you need for 4 servings. Stick to these measurements to ensure the salt to shrimp ratio stays balanced.
- 900g (2 lbs) Jumbo shrimp: 16-20 count, peeled and deveined. (Substitute: Extra large scallops work well with the same butter glaze.)
- 6g (1 tsp) Kosher salt: Necessary for the dry brine. (Substitute: Sea salt, but reduce by 25%.)
- 2g (1/2 tsp) Granulated sugar: For browning. (Substitute: Honey, but watch for faster burning.)
- 115g (1/2 cup) Unsalted butter: Melted. (Substitute: Ghee for a higher smoke point.)
- 6 cloves Fresh garlic: Minced to a paste. (Substitute: 1 tbsp garlic confit for a mellower vibe.)
- 15ml (1 tbsp) Fresh lemon juice: To cut the fat. (Substitute: Lime juice for a tropical twist.)
- 2g (1 tsp) Smoked paprika: For color. (Substitute: Ancho chili powder for mild heat.)
- 0.5g (1/4 tsp) Red pepper flakes: For a back of-the throat kick. (Substitute: Cayenne pepper.)
- 10g (2 tbsp) Fresh Italian parsley: Finely chopped for brightness. (Substitute: Fresh cilantro.)
Step-by-step Cooking Guide

Phase 1: The Brine
Toss your 900g of cleaned shrimp with the kosher salt and sugar in a glass bowl. Let them sit at room temperature for 10 to 15 minutes. Note: This draws moisture to the surface initially, then reabsorbs the seasoned liquid, seasoning the meat all the way through.
Phase 2: The Glaze
In a small bowl, whisk together the 115g of melted butter, garlic paste, lemon juice, paprika, pepper flakes, and parsley. Whisk vigorously until the mixture looks creamy and unified.
Phase 3: Threading
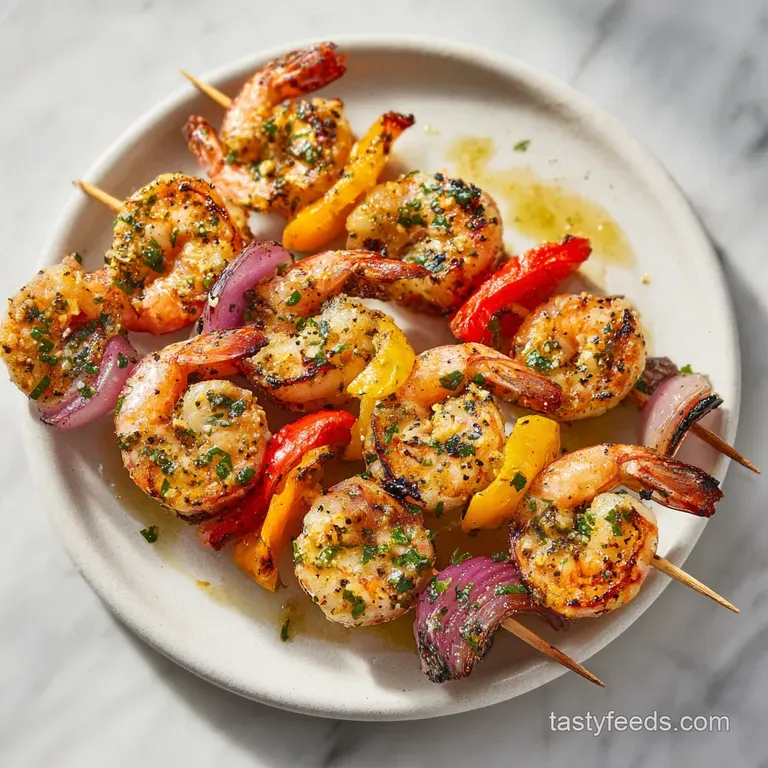
Thread 4 to 5 shrimp onto each skewer. Pierce through the thickest part of the body and then through the tail. This forms a secure 'C' shape. Leave a 5mm gap between each shrimp to ensure the heat reaches all sides.
Phase 4: Searing
Preheat your grill to high heat. Brush both sides of the skewers generously with the garlic butter. Place them on the hot grates. Grill for 3 minutes until the bottoms are pink and have dark grill marks.
Phase 5: The Flip
Flip the skewers carefully. Brush with more butter glaze. Grill for another 3 minutes until the shrimp are opaque and firm to the touch.
Phase 6: Finishing
Remove from the heat immediately. A final brush of the remaining garlic butter while they are resting is the secret to that "wet" look and intense flavor.
Troubleshooting and Fixes
Shrimp are unforgiving. If you leave them on for 60 seconds too long, they go from "velvety" to "pencil eraser." The most common issue is the garlic burning before the shrimp are done.
Rubbery and Dry Texture
If your shrimp are chewy, they’ve lost their internal moisture. This usually happens because the heat was too low, causing them to bake instead of sear. Next time, ensure the grill is at full tilt before the skewers touch the metal.
The Garlic is Burning
Garlic has a high sugar content and burns easily. If your garlic paste is turning black and bitter, move the skewers to a slightly cooler part of the grill or lift them up for a few seconds. Using a paste instead of chunks helps prevent this, as the paste integrates with the butter.
| Problem | Root Cause | Solution |
|---|---|---|
| Shrimp sticking | Grates weren't hot or clean | Clean grates and oil them lightly before placing shrimp. |
| No browning | Surface was too wet | Pat shrimp dry before the brine and ensure the grill is 250°C. |
| Loose shrimp | Single point threading | Thread through both the head end and the tail end of the shrimp. |
Common Mistakes Checklist
- ✓ Pat the shrimp bone dry before starting the brine process.
- ✓ Don't skip the sugar; it's the secret to that deep mahogany color.
- ✓ Use a microplane for the garlic chunky garlic will just fall into the grill.
- ✓ Keep the tails on; they act as a heat shield for the delicate tail meat.
- ✓ Never crowd the skewers; leave air gaps for even steam evaporation.
Scaling for the Crowd
When you're feeding a small army, you can't just double everything and expect it to work the same way. The logistics of the grill change when you have 20 skewers instead of 4.
Scaling Down (1-2 People) Reduce the shrimp to 450g. Use half the salt and sugar. For the egg based glazes (not used here, but common), you'd beat an egg and use half. Here, just halve the butter and spices. Cook time remains the same because the physical size of the shrimp hasn't changed.
Scaling Up (8-12 People) When doubling or tripling, do not double the salt and spices linearly. Increase salt and spices to 1.5x the original amount first, then taste. Reduce the lemon juice slightly to prevent the butter from becoming too thin.
Work in batches on the grill to avoid dropping the temperature of the grates too much at once.
Heat Method Comparison
While the grill is king for flavor, sometimes the weather or the lack of a backyard forces us indoors. Here is how the stovetop stacks up against the oven.
| Method | Time | Texture | Best For |
|---|---|---|---|
| Stovetop (Cast Iron) | 5-6 minutes | Deep crust, very snappy | Small batches, intense sear |
| Oven (Broil) | 4-5 minutes | Even cooking, less char | Large batches, hands off |
| Outdoor Grill | 6 minutes | Smoky, mahogany edges | Maximum flavor, authentic finish |
Myths About Grilling Shellfish
There is a lot of bad advice floating around the internet about how to handle shrimp. Let's clear the air so you can cook with confidence.
Myth: Searing "seals in" the juices. This is physically impossible. Searing actually causes moisture loss on the surface. However, we sear because it creates the Maillard reaction, which develops hundreds of new flavor compounds.
The "juiciness" comes from not overcooking the interior, not from some magical seal created by the heat.
Myth: You must marinate shrimp for hours. Absolutely not. Because shrimp are small and porous, an acidic marinade (like one with lemon juice) will actually "cook" the protein (like ceviche) and turn it mushy if left too long.
15 minutes for a dry brine is plenty; the flavor comes from the glaze applied during the cook.
Storage and Longevity
If you happen to have leftovers which is rare you need to handle them carefully. Seafood doesn't have the shelf life of a pot roast.
Storage: Keep cooked shrimp in an airtight container in the fridge for up to 2 days. To reheat, don't use the microwave unless you want rubber. Instead, toss them in a hot pan with a splash of water and a lid for 60 seconds just to take the chill off.
Freezing: You can freeze these for up to 1 month, but the texture will suffer slightly. Thaw them in the fridge overnight before reheating gently.
Zero Waste Tip: Don't throw away the shells if you peeled them yourself. Freeze them in a bag. When you have a few handfuls, simmer them with water, onion scraps, and a bit of celery to create a quick seafood stock. It's liquid gold for a future risotto or soup base.
What to Serve Alongside
These skewers are the star, but they need a supporting cast that won't overshadow the garlic butter. You want something that can soak up the extra glaze that inevitably drips onto the plate.
A pile of fluffy jasmine rice or a piece of crusty sourdough is essential for catching the garlic butter. If you want a vegetable side that matches the charred energy of the grill, these Roasted Onion Garlic Rosemary notes are a winner. The sweetness of the roasted onions plays perfectly against the acidity of the lemon in the shrimp glaze.
If you’re looking for a "Decision Shortcut": If you want extra crunch, leave the shells on but split them down the back (easy peel style). If you want more heat, double the red pepper flakes and add a dash of hot sauce to the butter.
If you want a cleaner finish, swap the butter for olive oil and add more fresh herbs at the very end.
Cooking these is about speed and confidence. Get that grill hot, keep your eyes on the color, and don't walk away. The best garlic butter grilled shrimp skewers are only 6 minutes of heat away from being on your plate. Enjoy the sizzle.
Recipe FAQs
Is it necessary to let the shrimp sit with salt and sugar before grilling?
Yes, this is essential. Letting the shrimp sit for 10-15 minutes acts as a dry brine, which improves moisture retention and texture. If you enjoyed learning how this simple salting technique creates a better final product, see how a similar preparation method benefits our Mediterranean Chicken Gyro.
How to thread shrimp onto skewers properly?
Pierce the thickest part of the body and the tail. This keeps the shrimp in a secure 'C' shape. Make sure to leave a tiny gap between each shrimp to ensure even air circulation on the grill.
How to avoid burning the minced garlic while grilling?
Keep your grill on high heat and watch the timing closely. Since minced garlic burns quickly, brush the glaze on generously and grill for exactly 3 minutes per side. The goal is to achieve a mahogany colored sear before the garlic carbonizes.
Is it true that microwaving leftovers is the best way to reheat these?
No, this is a common misconception. Microwaving will turn your shrimp into rubbery, inedible bites. Instead, reheat them in a hot pan with a splash of water and a lid for 60 seconds to gently warm them through.
How long can I keep cooked shrimp in the refrigerator?
Store them for up to 2 days maximum. Always place the leftovers in an airtight container to maintain freshness, as seafood loses quality much faster than other proteins.
How to tell when the shrimp are finished cooking?
Check for an opaque center and a mahogany colored sear. Grill for 3 minutes per side until they reach this visual cue. Avoid overcooking, as even 60 seconds too long will transform the texture from velvety to rubbery.
Can I freeze the shrimp skewers after they are cooked?
Yes, you can freeze them for up to 1 month. Keep in mind that the texture will likely suffer during the freezing process, so thaw them in the refrigerator overnight before reheating them gently.
Garlic Butter Shrimp Skewers