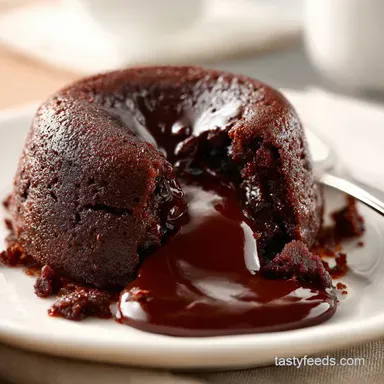
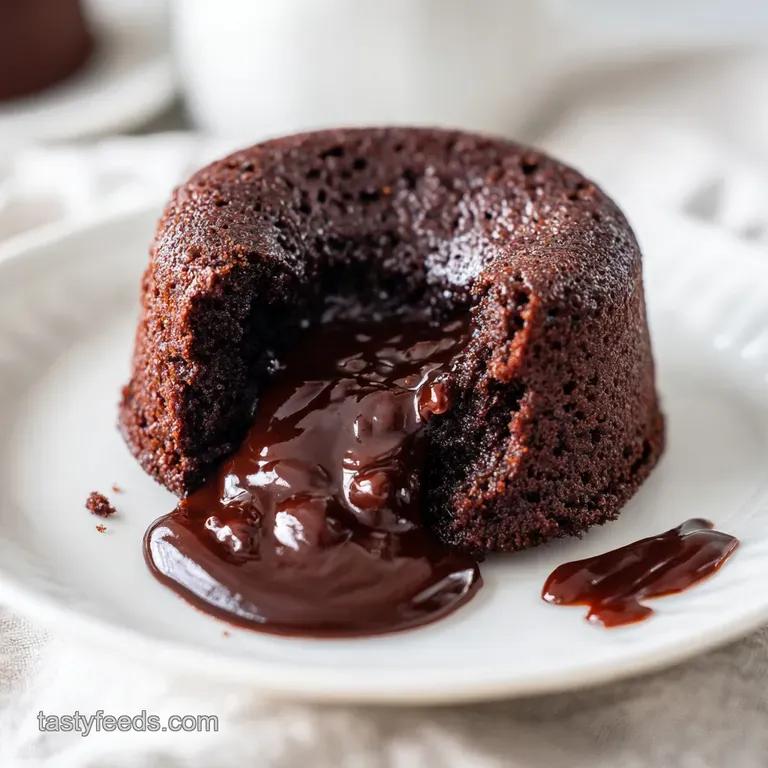
Paleo Molten Lava Cake: Velvety and Rich
- Time: 10 min active + 13 min baking = Total 25 min
- Flavor/Texture Hook: Velvety, molten chocolate center with a slightly crisp outer shell
- Perfect for: Impromptu date nights or a high end treat for someone who avoids grains
- Get This Paleo Molten Lava Cake Recipe Right
- The Secret to That Gooey Center
- Gathering Your Essentials
- Tools for a Clean Release
- Step by Step Baking Guide
- Fixing Common Lava Cake Issues
- Troubleshooting Common Issues
- Customizing Your Chocolate Treat
- Make-Ahead and Leftover Tips
- Perfect Complements
- Recipe FAQs
- 📝 Recipe Card
The smell of melting dark chocolate hitting a warm kitchen is basically my love language. I remember one anniversary where I decided to surprise my partner with these. I was so nervous about the "lava" part that I almost overbaked them into tiny muffins, but once I saw that center jiggle, I knew we had a winner.
There is something about that contrast between the hot, gooey core and a cold scoop of coconut cream that just feels like a hug in dessert form.
It is the kind of treat that makes you feel like you are in a fancy bistro, even if you are just wearing pajamas in your own kitchen. You get that rich, deep cocoa hit followed by a subtle nuttiness from the almond flour.
This paleo molten lava cake recipe is all about the tension between the firm edges and the flowing middle, making it a total showstopper for any occasion.
Trust me, once you see that chocolate river spill across the plate, you will never go back to store-bought treats. We are going for a texture that is almost like a dense truffle on the outside and a warm ganache on the inside. Let's crack on and get these in the oven.
Get This Paleo Molten Lava Cake Recipe Right
The magic here is all about the heat and the fat. Because we aren't using traditional flour, we don't have to worry about gluten developing and making the cake tough. Instead, we rely on the eggs to create a structure that holds just enough to keep the cake from collapsing, while the coconut oil and chocolate keep the interior fluid.
It's a bit of a balancing act. If the oven is too cool, the whole thing cooks through and you just have a chocolate cake. If it's too hot, the outside burns before the heat even touches the center. That's why we use a high temperature for a very short window of time.
Right then, let's look at what makes this specific version work.
- High Heat Set
- The 425°F temperature shocks the outside of the batter, creating a stable wall that traps the undercooked center.
- Almond Flour Hydration
- Almond flour doesn't absorb liquid like wheat flour does, which helps maintain that liquid, molten consistency.
- Fat Stability
- Coconut oil stays fluid at slightly higher temperatures than butter, contributing to that velvety flow when you cut into it.
- Protein Binding
- Eggs provide the necessary lift and structure, ensuring the cake doesn't just turn into a puddle of chocolate on the plate.
| Method | Bake Time | Texture | Best For |
|---|---|---|---|
| Oven | 13 minutes | Firm edge, molten core | Classic presentation |
| Stovetop (Bain marie) | 20 minutes | Soft, custard like | Silky consistency |
| Microwave | 90 seconds | Spongy, moist | Last minute cravings |
The Secret to That Gooey Center
Before we jump into the ingredients, we need to talk about how the components interact. When you're baking without grains, you're essentially managing a delicate emulsion of fats and proteins. According to King Arthur Baking, almond flour behaves differently than wheat because it lacks the starch and gluten that provide a traditional "crumb."
In this recipe, the almond flour isn't there to make a fluffy cake, but to give the molten center some body. Without it, the center would be too thin, almost like a syrup. With just a couple of tablespoons, we get a thick, fudgy consistency that feels luxurious on the tongue.
Component Analysis
| Ingredient | Science Role | Pro Secret |
|---|---|---|
| Dark Chocolate | Structural Base | Use 70% cocoa for a better contrast with the maple syrup |
| Eggs | Emulsifier | Room temperature eggs prevent the chocolate from seizing |
| Coconut Oil | Moisture Agent | Refined oil ensures no coconut taste interferes with the chocolate |
| Almond Flour | Thickener | Sift it first to avoid tiny white clumps in your dark batter |
Gathering Your Essentials
You don't need a massive pantry for this, but the quality of your chocolate really dictates the final result. Don't even bother with low quality compound chocolate; you want the real stuff with cocoa butter. It's the difference between a velvety finish and a waxy one.
For the sweetness, we're using maple syrup. It blends seamlessly into the chocolate and adds a depth that granulated sugar just can't match. If you've ever tried my Classic Pumpkin Muffins recipe, you know how well maple complements autumn style flavors, and it does the same here by rounding out the bitterness of the dark chocolate.
For the Batter
- 4 oz dairy-free semi sweet chocolate chips Why this? Provides the structure and the molten core
- 1/4 cup refined coconut oil Why this? High smoke point and neutral flavor
- 2 large eggs Why this? Binds everything and adds lift
- 2 tbsp pure maple syrup Why this? Natural sweetener with rich depth
- 2 tbsp blanched almond flour Why this? Adds body without adding gluten
- 1 tsp vanilla extract Why this? Enhances the chocolate notes
- 1/4 tsp sea salt Why this? Cuts through the richness
For the Mold
- 1 tsp refined coconut oil for greasing Why this? Prevents sticking
- 1 tsp cocoa powder for dusting Why this? Cleaner release than flour
Tools for a Clean Release
You don't need a professional kitchen to pull this off, but a few specific tools make the process foolproof. The most important part is the ramekin. If you use a dish that's too large, the batter spreads too thin and you'll end up with a flat pancake instead of a cake.
I recommend 6 ounce ramekins. They are the gold standard for this. Also, having a silicone spatula is a lifesaver here. You want to fold in the almond flour gently; if you beat the batter too hard, you'll incorporate too much air, which can lead to the cake collapsing once it hits the cool air.
Chef's Note: If you don't have ramekins, you can use small oven safe glass jars or even a muffin tin, though the release is much trickier. Just be extra generous with the coconut oil greasing.
Step by step Baking Guide

Right then, let's get into the actual process. Accuracy is key here, especially with the timing.
- Grease the inside of two 6 ounce ramekins thoroughly with coconut oil. Dust the insides with cocoa powder, tapping out the excess. Note: This creates a non stick barrier so the cake slides out easily.
- Combine the chocolate chips and coconut oil in a microwave safe bowl. Heat in 30 second bursts, stirring between each, until glossy and smooth. Let cool slightly. Note: Overheating chocolate can cause it to separate or burn.
- Whisk the eggs, maple syrup, and vanilla extract into the melted chocolate mixture until fully incorporated. Note: Ensure the chocolate isn't boiling hot, or you'll scramble the eggs.
- Gently fold in the almond flour and sea salt using a spatula until no clumps remain. Note: Keep it gentle to avoid over aerating the batter.
- Divide the batter evenly between the prepared ramekins.
- Bake at 425°F (218°C) for 12–14 minutes until the sides are firm and matte but the center still jiggles.
- Let the cakes rest in the ramekins for 2 minutes. Note: This allows the edges to set just enough to hold the weight.
- Run a thin knife around the edge, place a plate over the top, and invert quickly.
Fixing Common Lava Cake Issues
The most common complaint with this recipe is that the cake either comes out fully cooked or just collapses into a puddle. Both usually come down to timing and temperature.
Troubleshooting Common Issues
| Issue | Solution |
|---|---|
| Why Your Cake is Too Cakey | If there is no lava, you've simply baked it too long. Even one extra minute can turn a molten center into a solid one. Check your oven temperature with a thermometer if this happens repeatedly. |
| Why Your Cake Collapsed | This usually happens if the ramekins weren't greased well enough or if you inverted the cake too quickly. The 2 minute rest is non negotiable; it gives the structure a chance to stabilize. |
| Why the Batter is Grainy | This happens if the chocolate and oil weren't fully emulsified or if the eggs were ice cold, causing the fat to seize. Always stir well between microwave bursts. |
Common Mistakes Checklist
- ✓ Did you grease the sides and the bottom?
- ✓ Is the oven preheated to exactly 425°F?
- ✓ Did you stop baking while the center was still wobbly?
- ✓ Did you wait the full 2 minutes before flipping?
- ✓ Is the chocolate melted and smooth, not grainy?
Customizing Your Chocolate Treat
Once you've nailed the basic version, you can start playing with the flavors. One of my favorite tricks is to add a teaspoon of instant espresso powder to the batter. It doesn't make the cake taste like coffee, but it makes the chocolate taste "darker" and more intense.
If you want a bit of a surprise, you can push a single square of frozen dark chocolate or a dollop of almond butter into the center of the batter before baking. This guarantees a molten core even if you slightly overbake the rest of the cake. For those who love other grain free treats, this pairs beautifully with my Banana Muffins for a full dessert platter.
Flavor Modifications
- Nut Butter Core: Drop a teaspoon of cashew butter in the center.
- Zesty Twist: Add a pinch of orange zest to the batter for a bright, citrusy note.
- Extra Richness: Replace 1 tbsp of coconut oil with grass fed butter (if not strictly dairy-free).
- Lower Sweetness: Use 1 tbsp of maple syrup instead of 2.
Decision Shortcut
- If you want a richer, darker taste → Add 1 tsp espresso powder.
- If you want a guaranteed molten core → Insert a frozen chocolate chip in the center.
- If you want a firmer, more "cake like" result → Extend bake time by 1 minute.
Make-ahead and Leftover Tips
You can actually prep the batter in advance. Just pour it into the greased ramekins, cover them with plastic wrap, and keep them in the fridge for up to 24 hours. When you're ready, just pop them in the oven.
You might need to add 1-2 minutes to the bake time since the batter is starting from a cold temperature.
If you happen to have a leftover cake (which is rare), keep it in an airtight container in the fridge for up to 3 days. To bring back that molten magic, microwave it for 15-20 seconds. Don't overdo it, or you'll dry it out.
As for zero waste, if you have a bit of leftover batter, don't toss it. Put it in a small oven safe dish and bake it as a "tester" cake. Or, if you have leftover cocoa powder and coconut oil from the greasing process, mix them with a bit of maple syrup to make a quick chocolate glaze for some fruit.
Perfect Complements
The richness of this cake needs something to cut through the fat. A tart raspberry coulis or a handful of fresh blackberries is a great way to add brightness. The acidity of the berries balances the deep cocoa and maple notes.
Another great option is a dollop of chilled coconut whipped cream. The temperature contrast between the searing hot cake and the freezing cream is what makes this dish a classic. If you're feeling fancy, a sprinkle of flaky sea salt on top right before serving will make the chocolate flavors pop.
For a full meal experience, keep the main course light. A simple grilled salmon or a crisp garden salad works best, leaving plenty of room for this decadent finish. Trust me, you'll want the space.
Recipe FAQs
Why is my cake not molten in the middle?
You likely baked it too long. Even one extra minute can turn the center solid. Use an oven thermometer to ensure your temperature is exactly 425°F.
Is it true I must use a double boiler for the chocolate?
No, this is a common misconception. Heat the chocolate and oil in 30-second bursts in the microwave, stirring between each, to achieve a smooth melt quickly.
How to ensure the cake doesn't stick to the ramekin?
Grease the ramekins thoroughly with coconut oil and dust them with cocoa powder. Tap out any excess powder to create a clean, non-stick barrier.
Can I substitute almond flour with regular wheat flour?
No, that would make it no longer paleo. If you enjoyed balancing the nutty texture of almond flour here, see how we manage fruit and crumb textures in our apple crisp.
How to tell when the cakes are finished baking?
Look for firm, matte sides and a jiggling center. Pull them from the oven when the edges are set but the middle still moves slightly.
Why did my lava cake collapse after inverting?
The cake likely wasn't rested long enough. A 2-minute rest is non-negotiable to let the structure stabilize before you flip the cake onto a plate.
Is it okay to use coconut oil for both greasing and melting?
Yes, it is the best choice. Using coconut oil for both steps keeps the recipe paleo compliant and ensures a consistent texture.
Paleo Molten Lava Cake