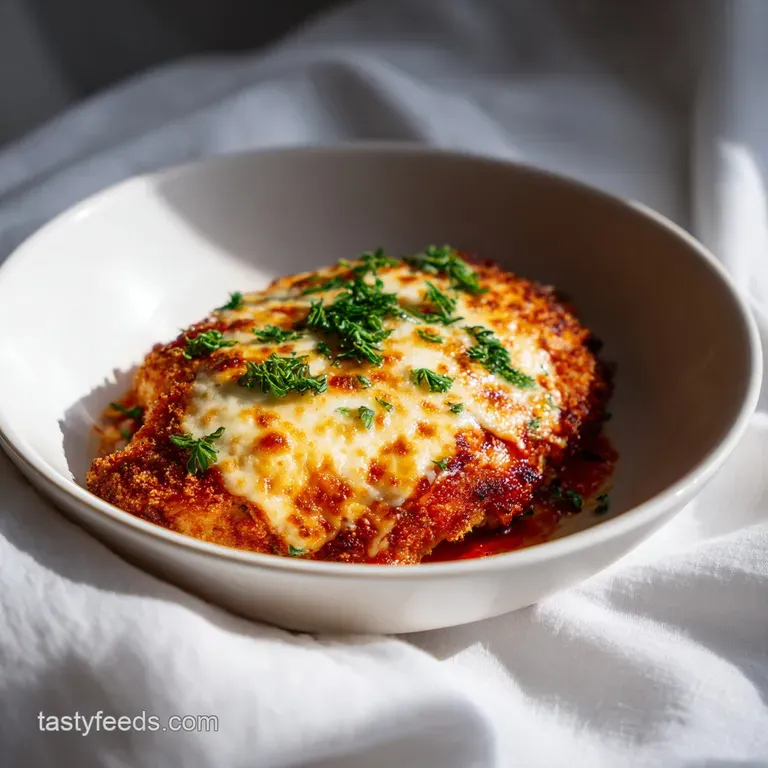
Baked Chicken Parmesan: Shatter Crisp

- Time: Active 15 minutes, Passive 20 minutes, Total 35 minutes
- Flavor/Texture Hook: Golden shatter crisp breading with molten mozzarella and tangy marinara
- Perfect for: Busy weeknight survival or a low stress "wow" dinner for guests
- Benefits of This Crispy Dish
- Essential Recipe Specs and Timing
- Crucial Ingredients and Flavor Components
- Minimal Tools for Maximum Flavor
- Step-by-Step Cooking and Preparation
- Solutions for Common Preparation Issues
- Creative Variations and Smart Substitutions
- Storage and Zero Waste Secrets
- Serving Suggestions and Side Pairings
- Recipe FAQs
- 📝 Recipe Card
Listen for that sound. You know the one - the rhythmic scraping of a sharp knife across a golden brown, craggy crust that sounds like stepping on dry leaves. That’s the "shatter" factor we’re going for here.
When you pull this Baked Chicken Parmesan out of the oven, the aroma of toasted garlic and bubbling mozzarella hits you first, but it’s that first bite, where the crispy Panko resists your fork just for a second before giving way to juicy chicken, that really seals the deal.
I’ll be honest with you: for years, I avoided making this at home. My early attempts were absolute disasters - either the chicken was as dry as a desert or the breading turned into a weird, mushy paste because I drowned it in sauce like it was a pasta dish.
I nearly gave up and stuck to takeout until I realized the trick isn't about the frying pan; it's about managing moisture and heat in the oven.
We've all been there, standing over a stove with oil popping onto our shirts, wondering if the middle is actually cooked. This version is my survival guide for the busy home cook. We're skipping the standing and frying phase entirely.
By the time you’ve finished tossing a quick salad, the oven has done the heavy lifting, and you’re looking at a tray of bubbly, cheesy perfection that didn't require a single splatter guard.
Benefits of This Crispy Dish
This method is built for the cook who hates cleaning grease off the backsplash. We’re using a over high heat roasting technique that mimics a deep fry without the heavy fat or the labor intensive flipping.
It’s a bold flavored win that feels like a cheat meal but keeps things light enough that you won't need a nap immediately after dinner.
The Architecture of the Shatter Crunch
The Hydrophobic Shield: Pre toasting the Panko crumbs in a dry pan for two minutes creates a moisture barrier. This prevents the marinara from soaking into the breading, ensuring the crust stays crispy even under a blanket of molten cheese.
Chicken Doneness and Timing Guide
| Thickness | Internal Temp | Rest Time | Visual Cue |
|---|---|---|---|
| 0.5 inch | 165°F | 3 mins | Juices run clear, no pink |
| 0.75 inch | 165°F | 5 mins | Firm to the touch, opaque center |
| 1.0 inch | 165°F | 7 mins | Meat springs back when pressed |
Right then, let's talk about why we pound the meat. If you have one side of the breast that's an inch thick and the other that's a taper, you're going to end up with half dry wood and half raw poultry. Use a heavy skillet or a rolling pin to get everything to a uniform half inch.
It’s the single best way to ensure every bite is equally juicy.
Essential Recipe Specs and Timing
If you're looking for a faster weeknight fix, my Homemade Butter Chicken recipe is another 30 minute wonder. But if your heart is set on that Italian American classic, this Baked Chicken Parmesan hits the table in just 35 minutes total. We're talking 15 minutes of prep - most of which is just setting up your "assembly line" - and a solid 20 minutes in the oven.
Chef Tip: Freeze your chicken for 10-15 minutes before you start. It firms up the muscle fibers, making it much easier to butterfly or pound flat without the meat tearing or sliding around under your plastic wrap.
Component Analysis
| Ingredient | Science Role | Pro Secret |
|---|---|---|
| Panko Crumbs | Structural Crunch | Toast them in a dry pan first to ensure they never turn soggy in the oven. |
| Parmesan Cheese | Umami Binder | Use finely grated "sand like" Parm; it melts into the breading to create a salty crust. |
| Large Eggs | Protein Adhesive | Add a splash of water to the eggs to break up the proteins for a thinner, even coat. |
Crucial Ingredients and Flavor Components
I’ve kept this list tight because nobody has time for a twenty ingredient spice rack search on a Tuesday. We're using 1.5 lbs of boneless skinless chicken breasts as our base.
For the breading, you’ll need 1 cup of Panko breadcrumbs - specifically Panko, not the dusty Italian style, because the larger surface area equals more crunch. Combine that with 0.5 cup of finely grated Parmesan cheese and 1 tbsp of Italian seasoning for that herbaceous punch.
The binder involves 0.5 cup of all purpose flour, 2 large eggs, and 1 tbsp of water. For the finish, we use 1.5 cups of marinara sauce (choose a thick one, not a watery "juice" style) and 1.5 cups of fresh mozzarella cheese, shredded.
Finally, 0.25 cup of fresh basil leaves, sliced into a chiffonade, adds that essential fresh finish.
Essential Breading Components
The Panko and Parmesan duo is non negotiable for the crunch. Why this? Panko creates airy pockets that crisp up faster than traditional breadcrumbs in dry heat.
The Protein and Binder
Flour and eggs are the "glue" that keeps your hard work attached to the meat. Why this? Flour absorbs surface moisture so the egg can actually grip the chicken.
Top Tier Cheese Choices
Fresh mozzarella is the dream for the "cheese pull" factor. Why this? It has higher moisture for melting but needs a quick drain to prevent sogginess.
Minimal Tools for Maximum Flavor
You don’t need a fancy kitchen to pull this off. A large rimmed baking sheet is your best friend here. If you have a wire cooling rack that fits inside the baking sheet, use it!
Elevating the chicken allows hot air to circulate underneath, which is the secret to a crispy bottom without flipping the meat halfway through.
You'll also need three shallow bowls for your dredging station. Don't use deep cereal bowls; you’ll just end up with breading up to your elbows. Flat pasta bowls or even pie tins work perfectly. A heavy bottomed skillet (like a Lodge) is great for the "pounding" phase if you don't own a dedicated meat mallet.
Just put the chicken in a gallon sized freezer bag first to keep things sanitary and mess free.
step-by-step Cooking and Preparation
- Preheat your oven to 400°F (200°C). Note: High heat is mandatory to "fry" the coating without overcooking the inside.
- Slice 1.5 lbs chicken breasts in half horizontally to make thin cutlets.
- Place cutlets between plastic wrap and pound to 0.5 inch thickness until uniform and flat.
- Set up three bowls: Flour in the first; 2 eggs beaten with 1 tbsp water in the second; Panko, 0.5 cup Parm, and 1 tbsp Italian seasoning in the third.
- Dredge each piece of chicken in flour, shaking off the excess until lightly dusted but not cakey.
- Dip into the egg wash, ensuring every nook and cranny is coated.
- Press firmly into the Panko mixture until the breading is packed on thick.
- Place chicken on a prepared baking sheet and bake for 15 minutes.
- Remove, spoon 1.5 cups marinara over the center of each breast, and top with 1.5 cups mozzarella.
- Bake for another 5 minutes until cheese is bubbly and edges are dark gold. Sprinkle with 0.25 cup fresh basil.
Solutions for Common Preparation Issues
One mistake I once made was putting the sauce on the bottom of the pan. It seemed logical like a cozy bed for the chicken but it resulted in a wet, sliding mess of breading that fell off the moment I touched it. Trust me on this: sauce goes on top, and only in the center.
Let the edges of the chicken stay exposed to the dry heat so they maintain that essential crunch.
Preventing the Soggy Bottom Trap
If your chicken is sitting in a puddle of water after baking, it's usually because the chicken was "plumped" with saline at the factory. Look for "air chilled" chicken if your budget allows. If not, pat that chicken dry like your life depends on it before you even touch the flour.
Quick Fix Guide
| Problem | Root Cause | Solution |
|---|---|---|
| Breadcrumbs falling off | Too much flour | Tap the chicken vigorously after the flour step; it should look like a light mist. |
| Chicken is tough | Overcooked | Use a meat thermometer to hit exactly 165°F and stop immediately. |
| Cheese isn't browning | Oven rack too low | Move the tray to the top rack for the final 2 minutes of baking. |
Common Mistakes Checklist
- ✓ Pat chicken completely dry with paper towels (prevents steaming).
- ✓ Don't skip the flour - it's the primer that makes the paint (egg) stick.
- ✓ Use a wire rack over your baking sheet to let air reach the bottom.
- ✓ Only sauce the very center of the chicken to keep the perimeter crispy.
- ✓ Let the chicken rest for 3 minutes before serving to keep the juices inside.
Creative Variations and Smart Substitutions
Honestly, don't even bother with low-fat cheese here. It doesn't melt; it just sweats and turns rubbery. If you want to change things up, try using a spicy Arrabbiata sauce instead of a standard marinara for a kick.
Or, if you're out of Panko, crushed crackers (like Ritz) can work in a pinch, though they bring a much higher salt content, so scale back the added seasoning.
Ingredient Swaps
| Original Ingredient | Substitute | Why It Works |
|---|---|---|
| Panko Breadcrumbs | Crushed Pork Rinds | Provides a massive crunch for keto needs. Note: Very salty, omit extra salt. |
| Fresh Mozzarella | Provolone Slices | Sharper flavor and melts very smoothly. Note: Use non smoked for classic taste. |
| All Purpose Flour | Cornstarch | Creates an even crispier, glass like crust. Note: gluten-free friendly. |
For a different take on crispy poultry, check out the Bang Bang Chicken Recipe which uses a similar over high heat method to achieve that signature crunch without a deep fryer. It's a great way to use the same tools for a completely different flavor profile.
Storage and Zero Waste Secrets
If you have leftovers, store them in an airtight container in the fridge for up to 3 days. But here’s the survival tip: do NOT microwave it. The microwave is the enemy of crispy breading. Instead, pop it back into a toaster oven or air fryer at 350°F for about 5 minutes.
This brings back the "shatter" in the crust and remelts the cheese without turning the meat into rubber.
For zero waste, don't toss the leftover dredging flour or breadcrumbs if they haven't touched the raw meat. However, if they have, throw them out. A better way to avoid waste is to only pour out half your breadcrumbs at a time, replenishing as you go.
Any leftover marinara can be frozen in ice cube trays perfect for when you just need a tablespoon of sauce for a sandwich later in the week.
Serving Suggestions and Side Pairings
The classic move is serving this over a bed of spaghetti, but if you want to keep things a bit lighter, zucchini noodles or a simple arugula salad with a lemon vinaigrette provide a great acidic contrast to the rich cheese and fried coating.
If you're going the pasta route, toss your noodles in a little bit of the marinara and a splash of pasta water before plating the chicken on top.
Classic Italian Pasta Pairing
A thin pasta like angel hair or thin spaghetti works best. It doesn't compete with the bulk of the chicken and soaks up any extra sauce perfectly. A quick sprinkle of extra Parmesan and a drizzle of olive oil over the pasta makes a huge difference.
Light Low Carb Veggie Sides
If you want to skip the carbs, roasted broccoli or sautéed spinach with plenty of garlic is the way to go. The bitterness of the greens cuts right through the fatty cheese. It’s a survival style dinner that feels balanced and bold without the heavy pasta weight.
Right then, you're ready to tackle the best Baked Chicken Parmesan of your life. Let's crack on!

Recipe FAQs
How do you cook chicken parmesan in the oven?
Bake at 400°F (200°C) on a rack over a baking sheet. First, bake the breaded chicken for 15 minutes to crisp the crust, then top with sauce and cheese, and bake for an additional 5 minutes until the cheese is melted and bubbly.
Should you bake chicken at 350 or 400?
400°F is highly recommended for crispiness. Lower temperatures, like 350°F, steam the breading rather than 'frying' it, which leads to a softer, soggier crust.
Should chicken parm be covered when baking?
No, do not cover it, especially not for the first bake. Covering traps steam which directly combats the crispiness you are trying to achieve; leave it uncovered so the breading dries out and crisps up under the dry heat.
What are some common mistakes to avoid when making chicken parmesan?
The biggest mistake is applying sauce before the breading is sealed and crispy. Also, avoid unevenly thick chicken breasts, which leads to overcooked edges and raw centers; pounding them uniformly to 0.5 inch prevents this and helps master the technique used in our Lemon Garlic Butter recipe.
What internal temperature must baked chicken parmesan reach?
The internal temperature must reach 165°F (74°C). Use a meat thermometer inserted into the thickest part of the breast to verify doneness; after reaching this temperature, let it rest for 3-5 minutes before cutting.
Why is my chicken parmesan breading turning soggy after baking?
Sogginess results from moisture buildup, usually from a wet cutlet or topping too early. Ensure you pat the chicken completely dry before breading and only apply sauce and cheese during the last 5 minutes of the total bake time.
Can I use an air fryer instead of an oven for crispier results?
Yes, an air fryer provides superior crispiness due to direct circulating heat. Cook the breaded chicken at 375°F for about 10-12 minutes, then add toppings and air fry for another 3-4 minutes, similar to how we use high heat to achieve texture in the Chicken Caesar Wrap recipe.
Crispy Baked Chicken Parmesan

Ingredients:
Instructions:
Nutrition Facts:
| Calories | 358 kcal |
|---|---|
| Protein | 38.5 g |
| Fat | 14.2 g |
| Carbs | 17.4 g |
| Fiber | 1.8 g |
| Sugar | 3.2 g |
| Sodium | 615 mg |
